
Photographed using the Fujifilm X-Pro 1
THE FULL RESOLUTION PHOTO CAN BE DOWNLOADED HERE
THE LOW RESOLUTION PHOTO CAN BE DOWNLOADED HERE
Photographed using the Fujifilm X-Pro 1
THE FULL RESOLUTION PHOTO CAN BE DOWNLOADED HERE
THE LOW RESOLUTION PHOTO CAN BE DOWNLOADED HERE
Sometimes its best to look at the interesting parts of a scene. The end result won’t look like another boring sunset…… take this photo as an example.
Do you like this?
Over the next week I would like to challenge you in your photography. Try photographing the smaller details of a scene rather than the complete scene. Let me know what results you get by posting a link in the comments below.
Captured using the Fujifilm X-Pro 1 and Fujinon 35mm f/1.4
THE FULL RESOLUTION PHOTO CAN BE DOWNLOADED HERE
THE LOW RESOLUTION PHOTO CAN BE DOWNLOADED HERE

The afternoon atmosphere gathered with excitement.
A colourful mass brewed ignited by the last light.
Reflections turned to glass mirroring the magnificent spectacle happening above.
Children played by the water’s edge as a man tried his luck at the ocean bounty.
Mirages filled the drizzled horizon exposing ghost ships shimmering in the afternoon heat.
I saw the scene developing before me.
The movement of the water would have to be masterfully timed.
My hands griped the salty leather surrounding my X-Pro 1.
Powering up, the aperture ring clicked into its normal stop.
With camera rotated my eye became fixed to the viewfinder.
A short wait and the wave behaved the way I had envisioned.
Captured using the Fujifilm X-Pro 1 and Fujinon 35mm f/1.4. Stitched in Photoshop.
THE FULL RESOLUTION PHOTO CAN BE DOWNLOADED HERE
THE LOW RESOLUTION PHOTO CAN BE DOWNLOADED HERE
People were out and about as the afternoon light fell upon the earth. I passed an energetic exerciser running on the beach as she was frantically being chased by a pack of wet dogs. The soggy reward of a tennis ball seemed to be enough to keep the dogs running up and down the beach. With dogs of all sizes running around me in every direction I had to be carefully carrying my camera as it might have been mistaken for a play thing. The dog owners seemed to sense my panic and the call of names filled the air. “Rex, Peach, Sacha, Lady – come here!”- “Lady come here!” With a delayed scurry, flicked sand filled the air and the disobedient dogs bolted in the direction of the newly found tennis ball. The though of a being jumped on by a wet slobbery retriever was too much to bear so I set off from the pack to capture the sunset.
Crashing waves broke on me as I walked the shallow shores of Mosman Beach. I headed for the rocks toward the end of the beach and was met by a young family fishing the shores. Trying not to interfere with their recreational activity I dodged the lines and found myself at this scene. Clouds on the horizon hung full of colour. I found some jagged rocks to fill the foreground and flicked the camera on. With the 18mm set on my Fujifilm X-Pro 1 I composed the image into three photographs as later I was going to stitch them together.
When I arrived home I got a little distracted from an immediate upload due to a tooth ache. After another journey to the chemist for some strong pain relief I find myself sitting here typing this story for you all and uploading the latest free photograph.
I hope you enjoy this image. I certainly enjoyed taking it.

THIS FULL RESOLUTION PHOTO CAN BE DOWNLOADED FOR FREE – CLICK HERE
Photographed with the Fujifilm X-Pro 1 (3 image stitch)
Rejoicing in the clear waters;
Flowing from every direction the moment filled the air.
The last swim.

THIS FULL RESOLUTION PHOTO CAN BE DOWNLOADED FOR FREE – CLICK HERE
Photographed with the Fujifilm X-Pro 1
Until Next Time – Happy Shooting
Australia is experiencing one of the biggest heat waves at the moment with temperatures in some parts of the country exceeding 50 degrees Celsius (122 Farenheit).
The car parks at my local beach, South Beach are filling up very quickly in the afternoon as workers and their families seek relief from heat of the day. As I only live less than a minute away from this beach its great to go down every now and then to cool off, get my feet wet and soak up the surroundings.
It’s not often I upload a photo straight to my blog without much post processing so consider this photo a rarity. I captured this photo with the Fujifilm X-Pro 1 which is probably why I didn’t need to do much to it. Clean and sharp. What more could you need?

THIS PHOTO CAN BE DOWNLOADED FOR FREE – CLICK HERE

Have you ever wondered how your film is developed?
So what’s first? Let me take you through the process…
To start get your favourite old camera out. You know that camera you found at an op shop or garage sale. The one that says Lomo on the side or Leica on the top? Either way its still around and you might as well put it to some use. Load your favourite film and continue by spending the morning or afternoon out photographing your favourite subject.
Once you have finished your shoot the satisfying sound of the rewinding film should be music to your ears. With a smile head into your local film lab to get your marvellous shots processed. At this point you should be smiling as you have captured images on the original camera sensor – film! ….and nothing beats the original right?

So now your film has arrived, you can continue on your journey while the staff at the film lab go ahead and turn your art into memories. Your little favourite film’s journey is just about to begin.
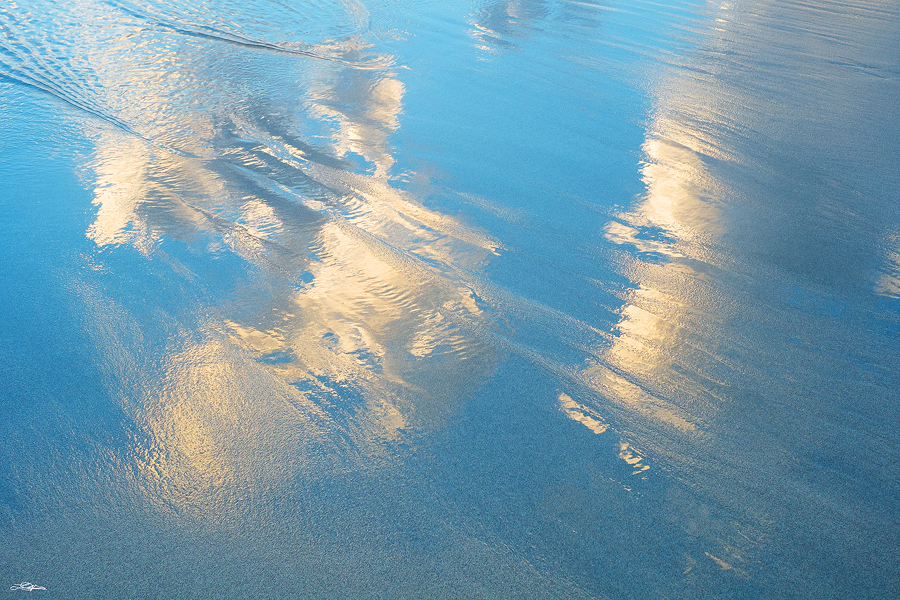
Soft patterns of light danced on the lapping waves. A warm velvet glow caressed the ocean tide leaving brief mirrored pastels along the shoreline.
Clouds gathered and the instrumental orchestral sound of the ocean drew me ever closer to the water’s edge. My mind was resting and I didn’t want to leave.
The sky was forming a masterpiece a painter could only dream of. The intensity of coloured light grew as the sun fell off the horizon’s edge, disappearing to reveal its colourful trick.
Cold fresh crisp air filled my senses with the intense aroma of salt. I took a deep breath and began to relax from my busy day.
My gaze became fixed beyond the soothing waves lapping at my feet. Minuscule silhouettes seemed to float lost on the distant water’s edge. I wondered how long these tiny vessels would sail the ocean tide before they reached their final destination.
Their journey had only begun. For me the day was at an end, an end that seemed to form magically before me.

THIS PHOTO CAN BE DOWNLOADED FOR FREE – CLICK HERE
Image details:
Photographed with the Fujifilm X-Pro 1 – 35mm – ISO 200 – f/4 – 1/210 second – 9 images vertically stitched
One of my first stops on my recent holiday was at the Albany Entertainment Centre. When I arrived in Albany I sent a message out on Facebook to see if anyone was keen to join me for a night photography shoot at Middleton Beach.
Local photographer Tina Bartley jumped at the idea. I have quite a bit of respect for this amazing lady. Tina is an amazing photographer with a keen eye for detail and composition. I have known Tina for some time as we meet on one of my courses I ran with Andrew Halsall while I lived in Albany (a few years back).
Thanks Tina for coming along and driving me around that night! I look forward to seeing many more of your fabulous images. Here is one of mine images from the night taken with the Fujifilm X-Pro 1.

Until next time – Happy Shooting
After working on weddings all of yesterday and this morning I decided to post another photo from my recent holiday.
The light in the South West of Western Australia is magnificent to photograph especially when the light warms the side of the hill as cool clouds roll by.

Photographed with the Fujifilm X-Pro 1 near Bridgetown, Western Australia.
Until next time – Happy Shooting.
POST UPDATED WITH NEW SPECIFICATIONS (SEE **UPDATED**) – 6TH SEPTEMBER 2012
Fujifilm are always pushing the boundaries when it comes to extreme developments within the imaging industry. Over the past decade Fujifilm released a number of exciting developments within professional photography arena.
The incredible Fujifilm S3 is still a camera that brings back great memories for professional wedding and studio photographers. I believe we are seeing another revolution in imaging with the ever-increasing family of X-Series cameras.
The recent X-100 camera has been highly successful for the iconic brand due to the manual design and impressive image quality. The X-100 camera has been out now for almost two years (announced 19th September 2010) so it really is no surprise that Fujifilm will be continuing the X-Series legacy with a new line of X series cameras. The X-E1 is one of those cameras soon to be announced by Fujifilm.
I have had a look at what the Fujifilm X-E1 may offer and I can speculate the following specifications.
Pictured below is Japanese made X-E1 which boasts the new XF 18-55mm lens with Super EBC coating.

14 Megapixels **UPDATED** 16 Megapixels
APS-C size sensor
Electronic Viewfinder – 460,000 Screen Dots **AMENDED** ** This should be screen resolution **
3.0″ LCD Screen
Diopter adjustment
Full HD Movie Recording
Electronic hot shoe to suit the Fujifilm EF-X20, EF42 and EF20 flash units.
Screw in shutter release for long exposures
7 White Balance Presets
RAW file format
Autofocus Modes – Contrast Detect (sensor), Centre, Continuous, Live View, Multi area and Single
HDMI output
USB 2.0
Exposure Compensation Dial +2, +1, 0, -1, -2
ISO Control Auto, 100-6400 (expandable to 12800) **UPDATED** (expandable to 25600)
Film Simulation Mode
Built in pop up flash (I would imagine this would be rated to 7-12 metres)
XF Lens Mount
AF/AE Lock
Still, Continuous and Manual Autofocus Modes
Bulb Shutter
3.0″ LCD Screen **UPDATED** (2.8″ LCD Screen)
SDHC/SDXC Memory Card Slot
NP-95 battery or NP-50 (Battery Life around 250 – 270 photos) **UPDATED** (Battery NP-W126 – Battery Life around 350 photos)
Level Assist and guide lines as a display mode
Customizable Function Button
Quick Mode – Where the user will be able to change the majority of camera settings without accessing the menu system.
AF Selection Mode
Silver or Black design
I would imagine the camera would be nice to hold as it looks to be a similar size to Fujifilm X-100. However the camera does look a bit smaller than the Fujifilm X-Pro 1.
The XF lens pin configuration system on the X-E1 is the same on the X-Pro 1 – hence my conclusion for the 6 different focus modes.


I’m sure this camera will be affordable for the pro-enthusiast. I can imagine the price to be around AU$1499.00 including the XF 18-55mm lens (AU$999 Body only?) . This of course is purely speculation as the camera hasn’t been officially announced by Fujifilm. If you want to read more about the X-Series camera system be sure to check out my review on the Fujifilm X-Pro 1.
Until next time – Happy Shooting!
This review is based solely on my own opinion about the camera. I have been using the X-Pro 1 since the beginning of May and have seen some amazing results.
All my photographs were taken as a RAW file and edited in some way using Adobe Lightroom 3/4 or Adobe Photoshop CS5.
I have spread my thoughts on this camera across different aspects that are important to me. If you are after a detailed spec review then this is not the site for you. This review is based on a user experience the highs and the lows….so lets get started!
To celebrate the camera’s ability to shoot in low light I put this video together. Enjoy.
Fujifilm have managed to design the X-Pro 1 with style, class and quality. The full metal body speaks highly of the cameras design. The X-Pro 1 fits like a glove. The sleek stylish curved body accentuates and oozes quality. Many say a poor man Leica? I say touch of class.
However there are a few things that I don’t like so much about the camera. I’ll get into those later on.
I have found the bold black magnesium alloy shapes aesthetically pleasing. The designer in my has ignited. I simply wanted to get my hands on one. Two months later and I am thankful I have one.
Having a history with professional DSLR cameras the physical size of the camera and lens combinations have been a pleasure to hold. Most compact pro cameras out there have simply been too small. The Olympus OM-D EM5, Nikon V1, Sony Nex 7 and Panasonic Lumix DMC-GX1 have all been in my hands before, all of which have lost their appeal due to their compact size (the closest thing to comfort out of these cameras would have to be the Olympus OMD with the grip on). Don’t get me wrong the other cameras out there take a great photo – what I am trying to say is coming from a Pro DSLR background, the Fujifilm X-Pro 1 simply feels better in my hands.
I think the Japanese do things well. For a camera to be in my kit it must be made in Japan or Germany. Quality is Japan and German – period. Luckily the X-Pro 1 was forged in Japan otherwise I wouldn’t even touch it!
All the buttons are ergonomically designed to fit the users hand. One of the main features I like about the design was the placement of the viewfinder. Too many cameras have the viewfinder in the middle. When you press your eye up against the viewfinder your nose becomes jammed up against the LCD which eventually smears the screen The X-Pro 1 has fixed that problem by moving the viewfinder to the side of the camera.

 DIALS
DIALS
The dials on the camera also reflect Fujifilm’s attention to detail. As you turn the on/off switch, the shutter speed dial or the exposure compensation dial you can be assured of the change as each movement is confirmed with a solid “click” as the dial moves into place. I have read a few reviews in my time and played with many cameras. One big issue for Fujifilm on the earlier X100 was the mode dial would move if you bumped it. This hasn’t been a problem on the X-Pro 1 as Fujifilm have added a much-needed lock on the shutter speed dial.
Coming from a Canon background I found when looking through the viewfinder navigating the button and dial configuration seemed second nature. When reviewing images on the 3 inch screen or through the 1,230,000 dot electronic viewfinder the colour and detail was very close to what I saw through my own eyes.

Hybrid viewfinder. Now there’s an idea. I found myself using this feature all to often. I’ll give you an example. I was photographing some stars on a moonless night near Pemberton, Western Australia. I travelled there only to find there was no bright light source to set my focus on. I had two cameras with me the Canon EOS 1D MK IV and the Fujifilm X-Pro 1. After setting both up on tripods I attempted to gain focus on the Canon. Using only the optical viewfinder I set the focus point to the center point and half pressed the shutter button. The Canon 17-40mm f4 L lens whirred and hunted back and forth trying its best to focus on the brightest star in the sky. After five minutes of trying I had no luck. I’m sure if the Canon could talk it was saying “I think I can…I think I can…” My eyes were too bad to attempt to manually focus so the camera was useless on this occasion. The Fujifilm X-Pro had its chance.
I set the hybrid viewfinder to the electronic viewfinder. WOW! I was blown away. Not only could the camera focus in almost pitch black it was like I was looking through a window into clear daylight. The electronic viewfinder boasted amazing quality and only took less than a second to gain autofocus! To this day I am still amazed a camera can perform better than how I see in low light. Fujifilm clearly got something right!

X-PRO 1 – 18mm – ISO 400 – f2 – 30 secs
The camera’s menu took a bit of getting use to. Although after the first week I seem to have mastered it.
Conveniently placed the menu button sits nestled in-between the selector keys. Once pressed the shooting menu tab is the first out of eight tabs to be displayed – five of which are camera settings and the remaining are playback settings.
Previously on the Fujifilm X100 menu you had to fight your way through various functions to get to the next page of settings. The main menu on the X-Pro 1 has been laid out with some thought – thanks Fujifilm for listening! The X-Pro 1 menu allows you to bypass all the unwanted settings by selecting a tab on the left hand side. Navigating your way around the menu is simple. The selector keys scroll up, down, left and right while the command dial controls the function of the mode you have selected.
For changing settings on the fly the X-Pro 1 features a Q (Quick) button. 15 of the most common settings appear as symbols on the back LCD allowing you to bypass the main menu. I was able to control what settings appeared on the Quick menu as the camera allowed 7 different custom screens. Each custom screen allowed me to save my favourite camera settings to the quick menu. For example I set a custom quick menu for low light shooting which centred around ISO and bracketing controls; the other custom menu was set for landscape photography where I pre-saved my film simulation mode to Velvia.
I think without the Quick mode Fujifilm would have made a huge mistake. This button was designed to keep the user out of the menu so they could spend more time shooting and it certainly worked for me!
Check out the video from the Fuji Guys on how the new menu works.
ISO can be set to the following:
L (100), 200, 250, 320, 400, 500, 640, 800, 1000, 1250, 1600, 2000, 2500, 3200, 4000, 5000, 6400
Auto (400), Auto (800), Auto (1600), Auto (3200)….ok now that’s over….. I tended to use ISO 400 right through to ISO 2500.
The camera has really challenged me with my photography. I am so used to carrying my clunky tripod or flash to capture the dimly lit scenes in life. With the X-Pro 1 I didn’t have to worry about all the other photographic paraphernalia. I was able to go anywhere and photograph anything.
Setting the ISO control to 3200 my head was telling me ARRRGHHHH what are you doing???? I wanted to explore the camera…I mean if Fujifilm were going to put a setting on the camera it had to be good right? I had to test it – sort of like when you have to test if the paint is dry just after painting…I got that feeling! The question was at ISO 3200 was there going to be noise?
Really ISO 3200?
BOOM!
No noise.
The shutter had been pressed when shooting some low light urban scenes in Melbourne and Fremantle and look no noise! Crazy!
This would definitely be one of the very best features on the camera. High ISO with no noise. What more could I want?

Fujifilm X Pro 1 – ISO 2500 – 35mm – f1.4 – 1/170sec – Split Toning in Adobe Lightroom 4.

Fujifilm X-Pro 1 – 18mm – ISO 200 – f10 – 5 secs

Fujifilm X-Pro 1 – 18mm – ISO 200 – f10 – 30 sec

Fujifilm X-Pro 1 – 18mm – ISO 200 – f2 – 1/4 sec
HD Video on the X-Pro 1 is a feature I am still dabbling in. However if you want to see what the quality is like at 720p I found this video showcasing the video quality. Remember to change the YouTube video setting to 720P HD for better viewing quality.
This sort of setting is not new for me. I have used this setting mainly on compact Fujifilm, Olympus, Canon and Sony cameras. The first series of cameras to bring this feature out were …how do I put it….crap.
The X-Pro 1 must have majored in sweep panoramas at production school! When it comes to sweeping the X-Pro 1 knows! The quality of the stitch is seamless if done correctly.
I pushed the camera to the limits by acting as a drunk and even portraying the smoker withdrawal shake. The pictures weren’t pretty….lets just say I found the limit. This mode is definitely not for the drunks. To be expected there were some problems with stitching due the rapid hand shake. My advice would be to use a tripod or monopod if you like your drink or smokes and suffer from withdrawals…this camera setting isn’t for you….but for everyone else all you need is a steady hand and you will be fine. This is the result in a high contrast scene. The outdoor light was pouring in and I don’t think I could have photographed this almost 180 degree view without the use of the sweep panorama mode.

Fujifilm X-Pro 1 – 35mm – ISO 1000 – f8 – 1/60 sec – Sweep Panorama Mode
Power consumption was probably one of my only dislikes on the camera (maybe because I used it so much!)
The CIPA (Camera and Imaging Products Association) standard is said to be 300 images from one charged battery. CIPA test under strict conditions. Each camera is turned on, the shutter button is pressed once taking a photo and the camera is then turned off. The process is repeated until the camera won’t turn on again. Fujifilm reached 300 cycles.
Fujifilm amped up the power from the previous X100’s NP-95 battery to the new Fujifilm NP-W126 battery. I would definitely recommend a spare as I found myself running out of power too often. The battery drain can really be likened to a car. Performance vehicles use a lot of fuel so really you should expect the X-Pro 1 to use a lot of battery.

The XF lens system has produced some amazing results. No detail was spared when designing these lenses. The tow lenes I have been using are the Fujifilm XF 18mm F2 R and the Fujifilm XF 35mm f1.4 R. My favorite out of the two would have to be the 35mm as it gives a true representation to what I see. Recently Fujifilm announced the XF 14mm f2.8, 18-55mm f2.8-4, 56mm f1.4, 27mm f2.8, 55-200mm f3.5-f4.8 and the new 10-24 f4.
I just wish I had the 10-24mm as it would provide a nice wide-angle for shooting my landscapes. Currently I am stitching all my photographs which is quite time-consuming.
Pictured below is the road map of Fujifilm XF lenses which will be released shortly.

Overall I think when it comes to reviewing a camera the image detail is one of the most important things. I won’t write too much more on this subject as the Jpeg images taken on the APS-C sized senor will show you . Take a look.
Fujifilm X-Pro 1 – 35mm – ISO 400 – f8 – 1/3000 sec

100% Crop

Fujifilm X-Pro 1 – 35mm – ISO 1000 – f2 – 1/300 sec

100% Crop

Fujifilm X-Pro 1 – 35mm – ISO 400 – f8 – 1/200 sec

100% Crop

Fujifilm X-Pro 1 – 35mm – ISO 400 – f8 – 1/4000 sec

100% Crop

THUMBS UP:
Full sized compact pro – fitted perfectly in my hands
High ISO with extremely low noise. I was able to shoot ISO 3200 with no problems at all.
Quick Menu allowed me to bypass the main menu for ease of operation
Hybrid Viewfinder worked well in low light situations.
Horizon tool on the rear LCD allowed me to get all my landscapes straight!
Magnesium alloy body meant I could take the camera anywhere without any problem.
XF lenses – clean, sharp and crisp – especially the 35mm f1.4
Amazing detail due to the removal of the low pass filter
Camera strap – the underside of the strap was rubberized and provided good grip. Never slid off my shoulder!
THUMBS DOWN:
Battery life – didn’t seem to last two days of shooting.
Diopter adjustment lens seemed to want to unscrew itself from the camera. I found it in my camera bag on one occasion.
Slow start-up time (compared with a Pro DSLR)
Overall I can recommend this camera to the keen enthusiast or professional photographer. The camera is light and perfect as a stand alone or second body. Shooting in low light stacks up against some of the bigger players like the Canon 5D MKIII and Nikon D800. I think the removal of the low pass filter to mimic film has paid off. Fujifilm have really developed a ground breaking camera adding to the overall success of the X series camera lineup. I look forward to seeing what other photographic boundaries can be pushed by Fujifilm in the coming year and I’m sure the X-Pro 1 will be just one of many X series cameras to wow the photographic world.
Until next time – Happy Shooting!
I wanted to see what the Full HD video would be like on the Fujifilm X Pro 1 so I headed for the sand dunes…..
CAUTION: This video may put you to sleep ;)
The final photos photographed with the Fujifilm X Pro 1 can be seen below.

Fujifilm X Pro 1 – ISO 200 – 35mm – f1.6 – 1/3800 sec

Fujifilm X Pro 1 – ISO 200 – 35mm – f8 – 1/550 sec

Fujifilm X Pro 1 – ISO 200 – 35mm – f8 – 1/1100 sec

Fujifilm X Pro 1 – ISO 200 – 35mm – f16 – 1/640 sec

Fujifilm X Pro 1 – ISO 200 – 35mm – f8 – 1/400 sec

Fujifilm X Pro 1 – ISO 200 – 35mm – f9 – 1/450 sec

Fujifilm X Pro 1 – ISO 200 – 35mm – f16 – 1/350 sec
Hey All,
I’ve been lucky enough to be given a Fuji X-Pro1 by Leigh Diprose for the last few days to give it a road test and see what I can do with it. I was heading away for the weekend already, so I took the X-Pro1 on a bit of a road trip around the south of Western Australia. My very initial impressions of the Fuji X-Pro1 is that it has an exceptional build quality, the camera is quite nice to hold even with my large hands, many of the smaller cameras seem to get lost in my hands. The controls are all fairly intuitive and very accessible, with in minutes of picking it up I was able to use most of the functions I would normally use on my dSLR.
First stop was about 3 hours drive out of Perth, I’m a sucker for clear night skies, we are lucky enough to have very little light pollution here in the west. I decided to give the Fuji a go at some star photography, normally I’d photograph this with my dSLR as it has quite good high-ISO performance.

Milky Way – Fuji X-Pro1
This image was photographed at ISO1600, f2.8 and a 30 second exposure. The camera was in single shot mode and this is a RAW image with minimal processing. Within the first 3 images I was incredibly impressed by the high ISO performance, there isn’t a huge amount of noise in this image and the clarity in the RAW image is exceptional. The straight jpeg was very similar to this RAW file that I’ve just added some sharpening to.

Dawn – Fuji X-Pro1
ISO1600, f2.0, 1/4000. This is a straight jpeg out of the camera with no adjustments, I’ve just resized it and added my signature. The noise levels are very acceptable, I’d have no issues printing this image fairly large. I’m very impressed with the dynamic range of the sensor too.
One of the more interesting modes I found for shooting was the automatic panoramic mode, you set the camera at your start point, press the shutter and sweep the camera from left to right, it then takes a series of images and stitches them together.

Fuji X-Pro1 – Panoramic mode
This is a slightly adjusted panoramic image, photographed with the Fuji X-Pro1 in panoramic mode. f4.0, ISO400, 1/220 the final full sized image is 5120 x 1440 px, so definitely a printable size.

Salt Lake – Fuji X-Pro1
This was photographed at: f8, 1/1500 and ISO800. I’ve done some processing in Adobe Camera RAW, the files are very flexible and retain a lot of detail.

Secluded Beach – Fuji X-Pro1
A RAW image with some minor tweaks in Camera RAW.
Overall I’m very impressed with the camera, I think it would make the perfect travel camera for someone who is accustomed to having professional level gear with them, but doesn’t want to have to carry it all over the world! This camera is definitely aimed at the enthusiast / semi-pro photographer, it has more than enough manual functions to keep any photographer happy, while retaining enough automatic modes to make it easy enough for the beginner to use. The files it’s 16mp sensor produces are very clean and very ready to print!
I have the camera for a few more days so I’m going to be trying out a few more seascape type images and a few other subjects. I’m definitely going to look into getting one, I’d really like to take one with me to Cambodia in September, I think it would be the ideal camera for the photo-journalist / documentary and street photographer.
Regards
Paul Pichugin
I found myself standing in front of billions of grains of sand forming a monumental mountain. The dirt danced in the air as short breaths of wind thrust the sand about. The wind howled, choreographing its own sandy air show. Sand clouds appeared before me – rising and falling in unison as they laid to rest upon the great dune. The sand was forever forming and changing.
I had a small window of opportunity to capture the magnificent wonder. My time was short and my lips were becoming parched from the windy conditions. I felt the threat of rain steadily approaching as the blackening gang of clouds rolled over toward me.
The camera strap felt secure around me neck as the cold wind tried to flatten me. My heels buried into the forgiving sand as I lined up for the shot. With a short steadying breath and cold metal pressed to cheek, I clicked the shutter button forging my first photo. The light and dark tones seemed to jump from the rear screen as I deciphered the small details of the dune. Upon noticing the detail it struck me the entire dune simply did not fit onto the small screen on the back of the camera – the dune was simply too big. Thinking about my options I decided to return the camera to a vertical shooting position and attempt a multi row panoramic.
My excitement to capture the perfect formation was child like. From left to right, overlapping RAW photos fired off one after another to replicate the scene in front of me. Full of energy and a spring in my step I proceeded to the car after the files saved quickly to the memory card. My thoughts of marrying the photos together and applying an artistic touch were unfathomable. I simply couldn’t wait to get home and put the photographs together.
I have included the original RAW photos below and additionally captured my screen as I turned the merged photos into a fine art photograph.

The above photos were stitched together using PTGui Pro
then edited using Adobe Photoshop CS5.

The end result
The people in their cars behind me must have thought I had a rubber neck as I consistently moved my head in every direction panning the skies for Osprey followed by more horizontal pans looking across the lifeless earth for the perfect landscape composition. I had been on the lookout for the momentous shot for some time and now the light was beginning to turn a golden hue. Time was running out.
I had frequented this road before. The long open road that produced a distant hopeful shimmer. We’ve all been there only to find the road continues on into an endless journey, and my journey had taken me to the beautiful Coral Coast in Western Australia. Bustling along my eyes rested upon a majestic pink lake nestled alongside the road. The wheels were spinning in full rotational motion as some of the scene passed, a quick stomp applied by my feet applied a relieved halting pressure to the brakes – I simply had to capture the developing scene before me.
The sound of the car door was behind me as I flurried into position. Jostling tripod and camera into some sort of balancing act I clicked the X Pro 1 into a starting position, the camera proceeded to perform with some sort of magic. The focus arrived as the composition fell perfectly into place – this was going to be one for the pool room.
I had been waiting for this sort of scene since the sun experience deja vu from the day before. The atmosphere was filled with silence as I quietly navigated the quick mode on the back of the cold metal camera body. Fingers easily falling upon the self timer mode I rested knowing the picture would be perfect. One click of the shutter button had confirmed my belief. My journey was complete.

Fujifilm X Pro 1 – ISO 400 – 35mm – f8 – 1/1900 sec
The perfect opportunity arose when I was fortunate to find myself with a rarity of four days off. I had been wanting to exercise my camera’s shutter at a unique West Australian landscape setting – a pink lake located in the small town of Port Gregory. My fascination to photograph this bizarre landscape arose when I peered out from my window in a very small plane heading to Karratha from Perth. Even though I am extremely colour blind I was clearly able to see the pink hues from the air. Amazingly the pinkness comes from a bacteria – Dunaliella salina which finds itself trapped within the salt crystal of the lake. The psychedelic colour is most vibrant around sunrise and sunset. That was my goal – to photograph two sunrises and one sunset.
Pen went to paper as my visual ideas for a great shot consumed me. I felt a bit like Gollum from Lord of the Rings, I was simply pursing one of my dreams to capture the ‘precious’ shot. The days drew nearer toward the 6 hour Skoda drive that would see me at my destination. My thought train was rumbling and steaming as I debated what photographic gear I would take. The usual suspects were there the tent, clothes, sleeping bag and the like but the burning question on my mind was which camera and lens combination should I use?
Pondering the question over a beer some sense came to mind – I thought “I’m travelling all that way I should just take it all.” So I did:
Fujifilm X Pro 1, Fujinon 18mm f2; Fujinon 35mm f1.4, Canon 1D MK IV, Canon 17-40mm, Canon 85mm f1.2, Sigma 120-300mm f2.8, Canon MP-E65 f2.8, Canon MT-24EX Flash, 3x Lee Filters and a stack of memory cards all stuffed into my Lowepro Nature Trekker Case…oh and don’t forget the Manfrotto 190XBPRO tripod!
The night had arrived when I found myself standing in front of the seemly quite and eerie destination. The scene before me was pitch black with an encompassing blanket of stars reflecting on the gigantic lakes’ every ripple. Delirious from the trip I managed to take one photo on the X Pro 1 before I set an alarm to wake my fading Red Bull and coffee filled mind up from its unnatural state.
The developed photograph intrigued me as it revealed a dull glow from a salt refinery on the distant horizon. The aura produced by the man-made structure seemed to interact with the greater constellations. There was something else to the photograph – it was a bit of a surprise – at first I thought I had captured some sort of military plane or an object you would see in documentaries over the famous Area 51 – I took a second photograph to confirm my belief…but alas the UFO was classic lens flare. Just quietly before I took the second photograph I couldn’t contain my excitement – I thought I had made contact!

Morning arrived with rain filled clouds and disappointment written all over my face. I wasn’t going to get the sunrise I had been dreaming of – the clouds were simply way to cumulus for any light to penetrate. Picking myself up I reached for the Fujifilm X Pro 1 to test its high ISO abilities. During my oscar winning sad-sack performance the heavens had a break and decided to have a sneak peek of a light show as the sun played hide and seek with the clouds. During the intensely short game I managed to pick off a few which made me bounce right back into being Leigh Diprose – the happy traveller.
The rest of the trip I experienced downpours, sand blasting winds and extreme chills (youtube videos to come). I opted to leave the X Pro 1 in the car due to the intensely bad weather. The only advance I saw in using the Canon in the horrible weather was it’s weather proofing – other than that the X Pro 1’s image quality was on par with the Canons. All of these images were photographed in RAW on the Fujifilm X Pro 1 with adjustments made in Lightroom 4.

ISO 800 – 35mm – f1.4 – 1/100 sec

ISO 200 – 35mm – f16 – 0.5 sec

ISO 200 – 35mm – f5.6 – 1/180 sec

ISO 200 – 35mm – f16 – 1/10 sec

ISO 200 – f35mm – f16 – 1/110 sec

ISO 200 – 35mm – f8 – 1/750 sec

ISO 200 – 35mm – f8 – 1/55 sec
Until next time.
Happy Shooting.
Fremantle, Western Australia known as ‘Freo’ to the locals is full enthusiasm for late nights, premium local beer, unique fashion and great coffee. The heritage city hosts a mixture of eclectic stereotypical hippies, hipsters, skaters and artists who all bring their own flavour to the streets and stores. I wanted to capture a glimpse into the culture that is Freo so I headed off on foot with the Fujifilm X Pro 1. Instantly I thought of the local Wool Stores where an assortment of posters and urban art coincide to bring life into the old heritage building. I thought a grunge theme would best showcase the building at night.
I was quite impressed with the sharpness of the cameras sensor within both photos. The light trail left by the bus in the square photograph created depth and interest within the long exposure. I found that it really broke up the plain brick wall into something interesting.
Fujifilm X Pro 1 – ISO 200 – 18mm – f10 – 30 sec
Fujifilm X Pro 1 – ISO 200 – 18mm – f2 – 1/4 sec
Last weekend I stopped into Mel and Shawn’s studio in Geraldton, Western Australia to lend a hand and test out the Fujifilm X Pro 1.
I was amazed at the depth of field the camera provided. I wanted to capture the depth in her beautiful eyes. The settings I used:
ISO 800 (to add texture to her hair) – 35mm – f2 – 1/120 sec.
What do you think? Do you think Jess’s eyes stand out?

My last visit to Melbourne was full of dark and gloomy scenes. As I walked the streets in the blanket of rain I managed to capture the little amount of available light using the Fujifilm X Pro 1 handheld. It was the camera and me. What more could a traveller want?
Usually I would be carrying around my Canon 1D MKIV with a wide angle or even a prime to shoot a bustling city however the ease and portability of the X Pro 1 allowed for a more enjoyable travelling experience. Compared to my Canon I was amazed at the image quality – especially with the higher ISO settings.
Simply put I’m glad that there is a professional camera out there that fits my travelling needs. All the below images were photographed shooting RAW and edited in Adobe Lightroom 4.
Fujifilm X Pro 1 – ISO 2500 – 35mm – f1.4 – 1/170sec – Split Toning in Adobe Lightroom 4.

Fujifilm X Pro 1 – ISO 800 – 35mm – f4.5 – 1/150 sec – Split Toning in Adobe Lightroom 4.

Fujifilm X Pro 1 – ISO 800 – 35mm – f1.4 – 1/100 sec – Edited using Adobe Lightroom 4.

Fujifilm X Pro 1 – ISO 200 – 35mm – f1.4 – 1/350 sec – Edited in Adobe Lightroom 4.

Fujifilm X Pro 1 – ISO 800 – 35mm – f1.4 – 1/80 sec – Edited using Adobe Lightroom 4.
I will be unboxing the new Fujifilm X-Pro 1 LIVE on a google+ hangout on Saturday night at 8pm (UTC/GMT Offset +8) !!!!! Come and join me
You will now be able to watch this hangout LIVE around the world directly on my YouTube Channel. I will share the link during the hangout via my various social networks.
Look forward to sharing this awesome camera with you all!


Well Canon have lifted the lid on another fantastic camera. If you are into video then this camera is for you. The “C” in the name is a bold statement from Canon branding the camera as a creative camera.
From what I have read the Canon EOS 1D C shares almost the same features as the identically looking Canon EOS 1D X camera. The internal build and circuitry of the newer camera handles the output temperature of the never seen before (in this size camera) amazing 4K (4,096 x 2,160) video ability. In simpler terms AWESOME FULL HD VIDEO QUALITY. The camera also has some features similar to the Canon C300 with the ability to capture a wide dynamic range and exposure latitude.
I would love to get my hands on one of these. Just imagine what the output quality would be like on the Full Frame 18 Megapixel CMOS sensor would be like! In my opinion this camera would be perfect for the cinema, media, documentary and wildlife industries due to the ability to use the new range of Cine lenses. The camera still boasts 12 frames per second and also has the ability to capture high res still images while shooting video. Canon have done well to expand the range of cine products before the other “yellow” brand. Now it is just going to be a waiting game until this camera ships late in the year from the pristine Canon factories in Japan.
For a more detailed view of this camera visit Canon’s website or check out the release news on dpreview.
For me this camera is big, black and beautiful. I can’t wait to get my hands on one.


