The charging bull elephant stampeded into the murky water, thrusting his long trunk high into the air.
The sound of splashing ringed in my ears. Blackened water erupted, upsetting the surface and its rival wake, each heaving step pounded in an effortless hustle.
My vision was drawn to the elephant’s emotive eye, its hazy reflection stared back at me, filling my finder.
I watched the backlight silhouette his age showing nothing but moving muscle and wrinkled hide.
His victory song could be heard for miles, the loud trumpeting signifying for his young family to follow.
Witnessing this experience was surely the heart of Africa. A moment I had longed to see.
Photographed in the Kruger National Park, South Africa
Is photography art? What about if you change a photo can you still call yourself a photographer?
These are some really big questions that will always split a room.
For me, my definition of a photographer is someone who captures a photo and then develops it into picture.
Looking through history this is exactly what a photographer would do. The process hasn’t changed a bit. The film was loaded into the camera and the photographer would set out and capture the images of life. Back in the darkroom the film was processed and projected by an enlarger to be made into a photo using various techniques.
Today, photography is no different. Digital has changed the way we shoot but hasn’t changed the photographer. For me I still shoot like I have a film camera. I ensure my composition, exposure and focus are all set correctly in camera before I take the photo and the only difference is I don’t to have to bother with chemicals to process my image – its instant. I simply import my images into my favourite software and process them the way I interpreted the scene. The reason I do this is because I have found no camera will ever capture the scene the way I saw it. I take the image and make it into a picture. So this makes me a photographer.
At this point you may be agreeing or disagreeing with me. Let me put it in perspective for you before we start bubbling over.
I will acknowledge there are many different types of photography out there. Not every type is the same. Some forms of photography require specific processes whereas some require no processing at all. Let me give you an example – photo journalism and documentary style photographers certainly don’t require much or in some cases any editing as the scene they present needs to show real life – how it happened. This wouldn’t be the case for a fine art photographer or digital artist. Just as the real life photographer capture the scene so does the creative photographer. The only difference is the creative photographer uses their imagination and art form to bring emotion and styling to the scene. The photo journalist will rely on the realism of the scene to bring an emotional reaction to the viewer. So really both sides can call themselves photographers, the only difference is the way they try to create emotion through their medium.
If you look through history, artists came in all forms. Painters, sculptors and even photographers would use their industry tools to create a piece of art which in most cases they would present to the world, hoping for some sort of emotional reaction. Today, photo journalists, documentary or fine art photographers are no different. Each still use their own industry tools to create emotion through their pieces of art. They simply use their tools differently.
For me I would call myself a fine art photographer as my main medium is photography. Photoshop is my studio and light is my canvas. I capture and frequently use textures and tones to create emotion within my scenes. I want to portray the way I perceive the scene to be.
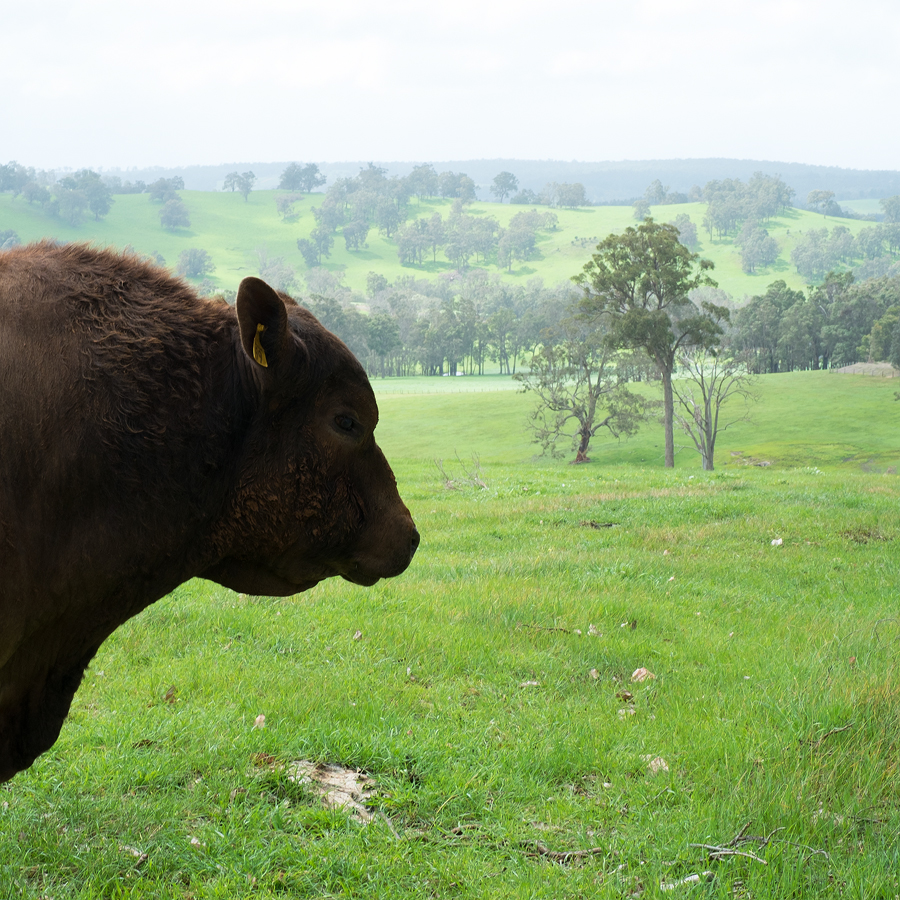
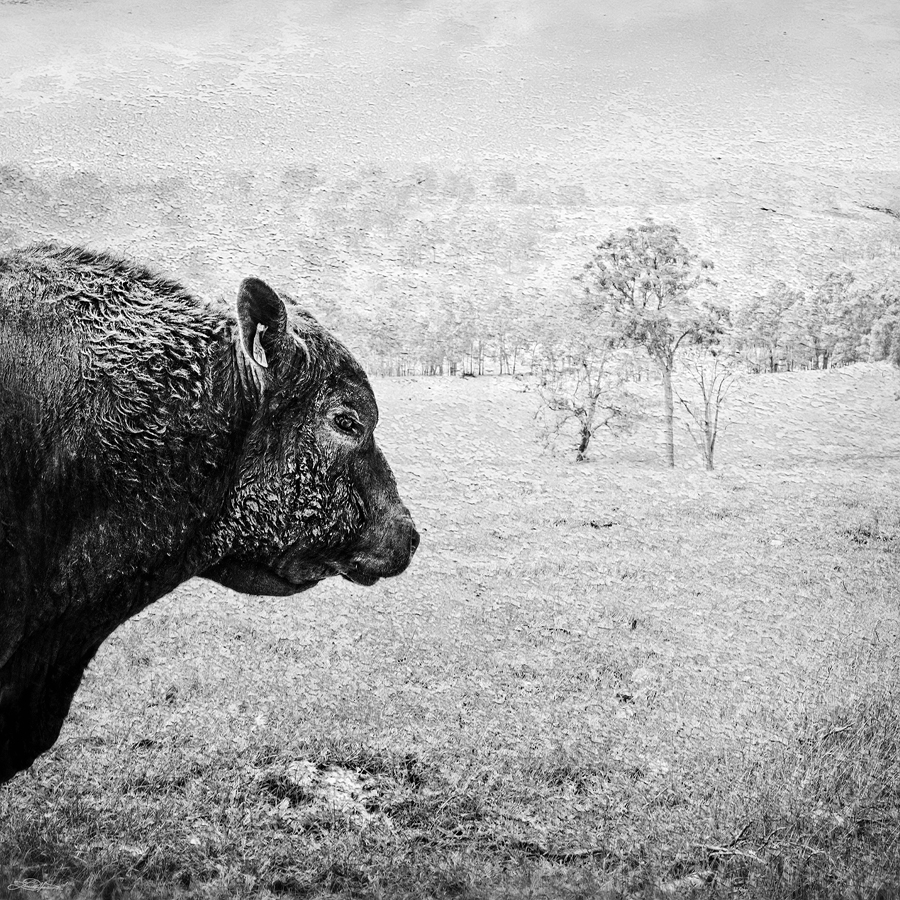
Let me give you an example. In the scene below I saw a gritty, dusty bull. I wanted to portray the strong, steadfast masculinity of the bull against the soft background fog, floating precariously in the background. I used strong salty textures and extreme sharpness with black and white tones to separate the bull from the background.
If I didn’t process this image in my digital darkroom (Photoshop) I feel the story wouldn’t have been as strong. Sure, the original looks good but why stay with good when I can make it great and tell a better story? Isn’t that limiting my creative abilities? Would the world be dumbing me down saying “that’s not a photo?!” I hope my explanation on a photographer will change that. What are your thoughts?
This is my view, I can’t really speak for all photographers out there but I would like to say I am an artist. I’m a photographer – no bull!
THIS PHOTO CAN BE DOWNLOADED FOR FREE – CLICK HERE
Achieving the correct exposure in a single photo can be quite challenging in difficult lighting situations. I have seen quite a few landscape photos with the most common problem being blown out skies where the photographer has exposed for the foreground and hasn’t taken an additional photo exposing for the sky. Gradient filters work to a certain degree but for the best exposure result I would recommend bracketing.
Bracketing means to take three separate photos of the same scene; one exposing for the highlights and the other two exposing for mid-tones and shadow areas. The result should look something like these images a friend took:
Exposing for the shadows
Exposing for the mid-tones
Exposing for the highlights
So now that the photos have been taken the big question is how do you go about merging the photos together into one high dynamic range photo? My answer….Photoshop.
Watch and learn as I take these photos (taken by a friend) through a quick lesson in Photoshop. The end result of the 2 part tutorial can be seen below (Part 2 will be out tomorrow).
If you have any questions on bracketing let me know by submitting a comment below.
After editing more wedding photos I thought I would put together an Instagram inspired photo in photoshop before I call it a night/morning. I call it Instashop!
Instashop – I highly recommend giving this a go. Simply open your photo in Photoshop, crop to a square and play. Let me know what results you come up with by sending me a link on the blog or Facebook. I look forward to see some crazy results!
After working on weddings all of yesterday and this morning I decided to post another photo from my recent holiday.
The light in the South West of Western Australia is magnificent to photograph especially when the light warms the side of the hill as cool clouds roll by.
Photographed with the Fujifilm X-Pro 1 near Bridgetown, Western Australia.
Photography can be a challenge at the best of times however being a colour blind photographer can sometimes make it a bit harder.
Colour blindness is a term used to describe a persons inability to see colour. The term colour blindness is really a misconception as people can see colours however they may not be able to distinguish between colours. In most cases it is referred to as being colour deficient not colour blindness. If you are unable to see colour you would be an achromatopsia sufferer. Fortunately for me I can still tell if a traffic light is green or red (thank goodness) but when it comes to identifying colours it becomes more difficult. This can affect my photography in a number of ways.
I found a video that might help explain the subject more clearly than I can:
There are three basic kinds of colour deficiency.
Completely monochromatic vision, where two or three of the photo pigments in your eyes cones are missing.
Dichromacy occurs when you’re missing a pigment: red (protanopia), green (deuteranopia) or blue (tritanopia).
Anomalies occur where one of your cone pigments isn’t quite right and doesn’t have the right spectral sensitivity, resulting in a reduction of your ability to discriminate colours. The red and green pigments are the most similar so it is easier for differences in them to impact the ability to distinguish colors. Protanomaly occurs when you have a slightly shifted red sensitivity, deuteranomaly occurs when your green sensitivity isn’t quite right. Tritanomaly is uncommon (as is tritanopia) and this occurs when your blue pigment isn’t right. This makes blue-yellow discrimination difficult.
When editing photos on my computer I don’t seem to have too much difficulty adjusting colour. Over time I have learned where the colour sliders should be to best represt colour. Something that also helps a great deal is the camera’s RAW files. I am able to change the white balance setting in post production which automatically corrects the colour within the scene. My problems start to occur when I play around with photos using Photoshop or Lightroom. For instance I may edit the colours within a seascape making the sunset more vivid. If I make a wrong move the rocks may turn a pink hue when all I wanted them to be was a natural colour. I have no way of distinguishing if the colour is correct so I rely on users comments and my memory of colour tools in Photoshop as my best guidance. Most of the time in my photographs I get away with correct colour. On the odd occasion you may see some horrid colour present in my photographs. If you do please tell me as I can’t see it!
When it comes to printing I leave it to the professionals. I have no clue what to do if a photo looks like it has too much magenta because I don’t know if it has too much magenta. Sounds a bit confusing I know but I can tell you now it is more frustrating than anything else.
I have had a search on the internet to find a similar test to ones I have done in the past. In the following video I could only see 3 of the numbers in the patterns. How many could you see? (some advice before watching the video….mute the music!)
Thanks to Kev Isabeth for the suggestion to write on this subject and to The Colour Blind Photographer for your descriptions on colour blindness.
This review is based solely on my own opinion about the camera. I have been using the X-Pro 1 since the beginning of May and have seen some amazing results.
All my photographs were taken as a RAW file and edited in some way using Adobe Lightroom 3/4 or Adobe Photoshop CS5.
I have spread my thoughts on this camera across different aspects that are important to me. If you are after a detailed spec review then this is not the site for you. This review is based on a user experience the highs and the lows….so lets get started!
To celebrate the camera’s ability to shoot in low light I put this video together. Enjoy.
DESIGN
Fujifilm have managed to design the X-Pro 1 with style, class and quality. The full metal body speaks highly of the cameras design. The X-Pro 1 fits like a glove. The sleek stylish curved body accentuates and oozes quality. Many say a poor man Leica? I say touch of class.
However there are a few things that I don’t like so much about the camera. I’ll get into those later on.
I have found the bold black magnesium alloy shapes aesthetically pleasing. The designer in my has ignited. I simply wanted to get my hands on one. Two months later and I am thankful I have one.
Having a history with professional DSLR cameras the physical size of the camera and lens combinations have been a pleasure to hold. Most compact pro cameras out there have simply been too small. The Olympus OM-D EM5, Nikon V1, Sony Nex 7 and Panasonic Lumix DMC-GX1 have all been in my hands before, all of which have lost their appeal due to their compact size (the closest thing to comfort out of these cameras would have to be the Olympus OMD with the grip on). Don’t get me wrong the other cameras out there take a great photo – what I am trying to say is coming from a Pro DSLR background, the Fujifilm X-Pro 1 simply feels better in my hands.
I think the Japanese do things well. For a camera to be in my kit it must be made in Japan or Germany. Quality is Japan and German – period. Luckily the X-Pro 1 was forged in Japan otherwise I wouldn’t even touch it!
CAMERA LAYOUT
All the buttons are ergonomically designed to fit the users hand. One of the main features I like about the design was the placement of the viewfinder. Too many cameras have the viewfinder in the middle. When you press your eye up against the viewfinder your nose becomes jammed up against the LCD which eventually smears the screen The X-Pro 1 has fixed that problem by moving the viewfinder to the side of the camera.
DIALS
The dials on the camera also reflect Fujifilm’s attention to detail. As you turn the on/off switch, the shutter speed dial or the exposure compensation dial you can be assured of the change as each movement is confirmed with a solid “click” as the dial moves into place. I have read a few reviews in my time and played with many cameras. One big issue for Fujifilm on the earlier X100 was the mode dial would move if you bumped it. This hasn’t been a problem on the X-Pro 1 as Fujifilm have added a much-needed lock on the shutter speed dial.
Coming from a Canon background I found when looking through the viewfinder navigating the button and dial configuration seemed second nature. When reviewing images on the 3 inch screen or through the 1,230,000 dot electronic viewfinder the colour and detail was very close to what I saw through my own eyes.
VIEWFINDER
Hybrid viewfinder. Now there’s an idea. I found myself using this feature all to often. I’ll give you an example. I was photographing some stars on a moonless night near Pemberton, Western Australia. I travelled there only to find there was no bright light source to set my focus on. I had two cameras with me the Canon EOS 1D MK IV and the Fujifilm X-Pro 1. After setting both up on tripods I attempted to gain focus on the Canon. Using only the optical viewfinder I set the focus point to the center point and half pressed the shutter button. The Canon 17-40mm f4 L lens whirred and hunted back and forth trying its best to focus on the brightest star in the sky. After five minutes of trying I had no luck. I’m sure if the Canon could talk it was saying “I think I can…I think I can…” My eyes were too bad to attempt to manually focus so the camera was useless on this occasion. The Fujifilm X-Pro had its chance.
I set the hybrid viewfinder to the electronic viewfinder. WOW! I was blown away. Not only could the camera focus in almost pitch black it was like I was looking through a window into clear daylight. The electronic viewfinder boasted amazing quality and only took less than a second to gain autofocus! To this day I am still amazed a camera can perform better than how I see in low light. Fujifilm clearly got something right!
X-PRO 1 – 18mm – ISO 400 – f2 – 30 secs
MENU
The camera’s menu took a bit of getting use to. Although after the first week I seem to have mastered it.
Conveniently placed the menu button sits nestled in-between the selector keys. Once pressed the shooting menu tab is the first out of eight tabs to be displayed – five of which are camera settings and the remaining are playback settings.
Previously on the Fujifilm X100 menu you had to fight your way through various functions to get to the next page of settings. The main menu on the X-Pro 1 has been laid out with some thought – thanks Fujifilm for listening! The X-Pro 1 menu allows you to bypass all the unwanted settings by selecting a tab on the left hand side. Navigating your way around the menu is simple. The selector keys scroll up, down, left and right while the command dial controls the function of the mode you have selected.
For changing settings on the fly the X-Pro 1 features a Q (Quick) button. 15 of the most common settings appear as symbols on the back LCD allowing you to bypass the main menu. I was able to control what settings appeared on the Quick menu as the camera allowed 7 different custom screens. Each custom screen allowed me to save my favourite camera settings to the quick menu. For example I set a custom quick menu for low light shooting which centred around ISO and bracketing controls; the other custom menu was set for landscape photography where I pre-saved my film simulation mode to Velvia.
I think without the Quick mode Fujifilm would have made a huge mistake. This button was designed to keep the user out of the menu so they could spend more time shooting and it certainly worked for me!
Check out the video from the Fuji Guys on how the new menu works.
Auto (400), Auto (800), Auto (1600), Auto (3200)….ok now that’s over….. I tended to use ISO 400 right through to ISO 2500.
The camera has really challenged me with my photography. I am so used to carrying my clunky tripod or flash to capture the dimly lit scenes in life. With the X-Pro 1 I didn’t have to worry about all the other photographic paraphernalia. I was able to go anywhere and photograph anything.
Setting the ISO control to 3200 my head was telling me ARRRGHHHH what are you doing???? I wanted to explore the camera…I mean if Fujifilm were going to put a setting on the camera it had to be good right? I had to test it – sort of like when you have to test if the paint is dry just after painting…I got that feeling! The question was at ISO 3200 was there going to be noise?
Really ISO 3200?
BOOM!
No noise.
The shutter had been pressed when shooting some low light urban scenes in Melbourne and Fremantle and look no noise! Crazy!
This would definitely be one of the very best features on the camera. High ISO with no noise. What more could I want?
Fujifilm X Pro 1 – ISO 2500 – 35mm – f1.4 – 1/170sec – Split Toning in Adobe Lightroom 4.
Fujifilm X-Pro 1 – 18mm – ISO 200 – f10 – 5 secs
Fujifilm X-Pro 1 – 18mm – ISO 200 – f10 – 30 sec
Fujifilm X-Pro 1 – 18mm – ISO 200 – f2 – 1/4 sec
MOVIE
HD Video on the X-Pro 1 is a feature I am still dabbling in. However if you want to see what the quality is like at 720p I found this video showcasing the video quality. Remember to change the YouTube video setting to 720P HD for better viewing quality.
SWEEP PANORAMA
This sort of setting is not new for me. I have used this setting mainly on compact Fujifilm, Olympus, Canon and Sony cameras. The first series of cameras to bring this feature out were …how do I put it….crap.
The X-Pro 1 must have majored in sweep panoramas at production school! When it comes to sweeping the X-Pro 1 knows! The quality of the stitch is seamless if done correctly.
I pushed the camera to the limits by acting as a drunk and even portraying the smoker withdrawal shake. The pictures weren’t pretty….lets just say I found the limit. This mode is definitely not for the drunks. To be expected there were some problems with stitching due the rapid hand shake. My advice would be to use a tripod or monopod if you like your drink or smokes and suffer from withdrawals…this camera setting isn’t for you….but for everyone else all you need is a steady hand and you will be fine. This is the result in a high contrast scene. The outdoor light was pouring in and I don’t think I could have photographed this almost 180 degree view without the use of the sweep panorama mode.
Power consumption was probably one of my only dislikes on the camera (maybe because I used it so much!)
The CIPA (Camera and Imaging Products Association) standard is said to be 300 images from one charged battery. CIPA test under strict conditions. Each camera is turned on, the shutter button is pressed once taking a photo and the camera is then turned off. The process is repeated until the camera won’t turn on again. Fujifilm reached 300 cycles.
Fujifilm amped up the power from the previous X100’s NP-95 battery to the new Fujifilm NP-W126 battery. I would definitely recommend a spare as I found myself running out of power too often. The battery drain can really be likened to a car. Performance vehicles use a lot of fuel so really you should expect the X-Pro 1 to use a lot of battery.
LENSES
The XF lens system has produced some amazing results. No detail was spared when designing these lenses. The tow lenes I have been using are the Fujifilm XF 18mm F2 R and the Fujifilm XF 35mm f1.4 R. My favorite out of the two would have to be the 35mm as it gives a true representation to what I see. Recently Fujifilm announced the XF 14mm f2.8, 18-55mm f2.8-4, 56mm f1.4, 27mm f2.8, 55-200mm f3.5-f4.8 and the new 10-24 f4.
I just wish I had the 10-24mm as it would provide a nice wide-angle for shooting my landscapes. Currently I am stitching all my photographs which is quite time-consuming.
Pictured below is the road map of Fujifilm XF lenses which will be released shortly.
IMAGE DETAIL
Overall I think when it comes to reviewing a camera the image detail is one of the most important things. I won’t write too much more on this subject as the Jpeg images taken on the APS-C sized senor will show you . Take a look.
Full sized compact pro – fitted perfectly in my hands
High ISO with extremely low noise. I was able to shoot ISO 3200 with no problems at all.
Quick Menu allowed me to bypass the main menu for ease of operation
Hybrid Viewfinder worked well in low light situations.
Horizon tool on the rear LCD allowed me to get all my landscapes straight!
Magnesium alloy body meant I could take the camera anywhere without any problem.
XF lenses – clean, sharp and crisp – especially the 35mm f1.4
Amazing detail due to the removal of the low pass filter
Camera strap – the underside of the strap was rubberized and provided good grip. Never slid off my shoulder!
THUMBS DOWN:
Battery life – didn’t seem to last two days of shooting.
Diopter adjustment lens seemed to want to unscrew itself from the camera. I found it in my camera bag on one occasion.
Slow start-up time (compared with a Pro DSLR)
OVERALL
Overall I can recommend this camera to the keen enthusiast or professional photographer. The camera is light and perfect as a stand alone or second body. Shooting in low light stacks up against some of the bigger players like the Canon 5D MKIII and Nikon D800. I think the removal of the low pass filter to mimic film has paid off. Fujifilm have really developed a ground breaking camera adding to the overall success of the X series camera lineup. I look forward to seeing what other photographic boundaries can be pushed by Fujifilm in the coming year and I’m sure the X-Pro 1 will be just one of many X series cameras to wow the photographic world.
Chaos surrounded me, the chorus of flapping was deafening. Each bird seemed to know the direction of the other as the flock took to wing. A moving dark cloud of beak, feet and squawks captivated me to hold the camera tightly and to compose this image.
I painted this photograph using Photoshop to portray a sense of scale. The movement of the birds frozen in time creates an awareness into how busy life can get. Slowing down our lives lets us look at scene in front of us. “Beauty lies before us we just have to stop every now and then to see it.” – Leigh Diprose.
The plan now is to print this artwork onto canvas (as soon as my printer is fixed) and display it in the entry. This photograph means quite a bit to me. I hope you enjoy it to.
I’m interested – what do you feel when you see this image?
Olympus have done very well to put amazing specifications into such a small camera body. Holding the OM-D with the new Olympus 75mm f1.8 lens attached simply made photography enjoyable. Shooting in low light hand held wasn’t a problem.
This is a quick portrait photo I took of Sean Standen – aka “Stakky” in Northbridge, Western Australia. Check out the meta data below the image. Hand held at what???? Crazy!
(Just so you know the lighting was poor and outside it was freezing – I was shaking when I took this image so it may be a little bit burry)
I will be doing a review on this camera in the future so stay tuned to see the photo quality stack up against the Canon 1D MK IV and the amazing Fujifilm X-Pro 1.
I was challenged after seeing a Facebook post from ABC 1 TV program “Photo Finish”. The brief was simple – “Submit the most creative and imaginative photograph you can – it can capture or depict anything you like! There is a trick to it though, every photo must include a camera lens somewhere in the shot. The lens can appear anywhere in the photo, but it must be there!”
I quickly got to work and compiled three images that were going to tell a story. The photos were taken using the Fujifilm X Pro 1 and Canon 1D MK IV.
Image 1 – The old fire place to ignite the photo
Image 2 – Some ghostly clouds to add some atmosphere
and lastly a photo of my old Canon 400mm f/5.6L USM lens
The next step was to combine the photos in Photoshop to meet the competition brief
I found myself standing in front of billions of grains of sand forming a monumental mountain. The dirt danced in the air as short breaths of wind thrust the sand about. The wind howled, choreographing its own sandy air show. Sand clouds appeared before me – rising and falling in unison as they laid to rest upon the great dune. The sand was forever forming and changing.
I had a small window of opportunity to capture the magnificent wonder. My time was short and my lips were becoming parched from the windy conditions. I felt the threat of rain steadily approaching as the blackening gang of clouds rolled over toward me.
The camera strap felt secure around me neck as the cold wind tried to flatten me. My heels buried into the forgiving sand as I lined up for the shot. With a short steadying breath and cold metal pressed to cheek, I clicked the shutter button forging my first photo. The light and dark tones seemed to jump from the rear screen as I deciphered the small details of the dune. Upon noticing the detail it struck me the entire dune simply did not fit onto the small screen on the back of the camera – the dune was simply too big. Thinking about my options I decided to return the camera to a vertical shooting position and attempt a multi row panoramic.
My excitement to capture the perfect formation was child like. From left to right, overlapping RAW photos fired off one after another to replicate the scene in front of me. Full of energy and a spring in my step I proceeded to the car after the files saved quickly to the memory card. My thoughts of marrying the photos together and applying an artistic touch were unfathomable. I simply couldn’t wait to get home and put the photographs together.
I have included the original RAW photos below and additionally captured my screen as I turned the merged photos into a fine art photograph.
The above photos were stitched together using PTGui Pro
I have been working on this background for an interesting project – my self portrait. Over my many years of portrait photography I have never taken my own photograph so I’m considering it a challenge. Next month there will be a Photoshop video showing how I will get to the final image.
My self portrait is a work in progress….the background is sorted so now all I have to do is add in the rest….hopefully it works out.
“Super Cool” is my explanation of this ground breaking product.
Microsoft have certainly created some amazing hardware products over the years. The amazing team at the Microsoft Redmond campus has been busy. Designers, development engineers, manufacturing engineers, industrial designers, hardware testers have been busier than Santa at Christmas creating a revolutionary product that showcases the best of design and powerful performance. An idea for a revolutionary product has progressed through numerous prototypes and countless man hours to evolve into something beautiful. The product I am talking about is Microsoft Surface for Windows 8 Pro. The technology is complex and the high-end product is perfect, high quality and beautiful. Period.
Build as a stage for Windows 8, Surface is a device that fits perfectly into your hands due to a perfect design of a 22 degree beveled angle to the outer edge of the tablet.
Creative and productivity has a new home. The Microsoft surface is available will be available in two different models – Surface for windows RT (available as a 32GB or 64GB tablet) and the Surface for Windows 8 Professional (available as a 64GB or 128GB tablet).
Microsoft Surface for Windows 8 Pro is the perfectly designed product for now and the future generations.
The tablet has been moulded from VapourMg a product made from mostly magnesium to allow durability and seamless design. Each individual layer of the VapourMg housing has been individually moulded to .65mm with precision allowing for a rigid and seamless design. The case takes approximately 152 steps to get to the final stages of development.
Some of the stand out features on the device would have to be the built-in kickstand and the touch cover.
The built-in kickstand is constructed from the same VapourMg and is only .7mm thick. This has allowed the kickstand for seamless integration within the tablet housing. The Microsoft team wanted to create an emotional attachment to the end user so the feel and sound of the kickstand was very important, when the kickstand closes it sounds like a high-end car door closing. Amazing!
The Surface Windows 8 Pro features a magnetic accessory spine which connects the touch cover by simply ‘clicking’ in. The touch cover and in fact all the Surface products are all perfectly designed to work together due to all products being designed together.
Once connected the Touch cover will automatically change the colour of the screen to the colour of the touch cover. An outstanding feature of the touch cover is the built-in keyboard located on the inner cover. The keyboard touch cover is an amazing 3mm thin and has been designed just like a book cover. Once connected the spine of the tablet feels like a book. You can also fold the cover back as it has a accelerometer built into it to notify the tablet when it isn’t in use.
The keyboard measures touch 10 times faster than any keyboard that is currently on the market allowing the user to touch freely and quickly. However if you are like me an prefer touching keys Microsoft have developed an additional Type Cover. Type Cover keys have a 1.5mm travel allowing the user to touch type with ease. Both the Touch Cover and Type Cover feature a trackpad.
I am told Surface Windows 8 Pro will be available to purchase three months after the release of Surface for Windows RT.
Connectivity needn’t be an issue as both Surface devices feature dual high performance antennas for WiFi (currently the only model on the market to do so). The performance of the tablet delivers the same power of a high-end PC so it won’t hinder the creativity of the user. The Intel 3 generation Core i5 processor allows the user to perform heavy tasks like editing image in Photoshop something I am looking forward to.
Sharing your creative designers or ideas is simple. You can connect the 1080P Gorilla Glass 2.0 tablet to a HDMI connection to enhance your broadcast. USB is also an option so if you are on the road like me charging your phone has never been easier!
The actual transfer speed of the device is five time faster than USB 2.0 – For example 1GB of high quality photos only takes 5 seconds to download so dealing with large format photographs has never been so easy. I can’t wait to see what the Fujifilm X Pro 1 photos will be like on the device. I’m sure they will be beautiful.
I simply can’t wait for this device to hit retail shelves. I know for once I will be in the line to get my hands on one of these amazing products. I hope you can come on the technology journey with me. If not sit back and relax as you will find my future roaming posts will be created on one of these marvellous devices.
Fremantle, Western Australia known as ‘Freo’ to the locals is full enthusiasm for late nights, premium local beer, unique fashion and great coffee. The heritage city hosts a mixture of eclectic stereotypical hippies, hipsters, skaters and artists who all bring their own flavour to the streets and stores. I wanted to capture a glimpse into the culture that is Freo so I headed off on foot with the Fujifilm X Pro 1. Instantly I thought of the local Wool Stores where an assortment of posters and urban art coincide to bring life into the old heritage building. I thought a grunge theme would best showcase the building at night.
I was quite impressed with the sharpness of the cameras sensor within both photos. The light trail left by the bus in the square photograph created depth and interest within the long exposure. I found that it really broke up the plain brick wall into something interesting.
My last visit to Melbourne was full of dark and gloomy scenes. As I walked the streets in the blanket of rain I managed to capture the little amount of available light using the Fujifilm X Pro 1 handheld. It was the camera and me. What more could a traveller want?
Usually I would be carrying around my Canon 1D MKIV with a wide angle or even a prime to shoot a bustling city however the ease and portability of the X Pro 1 allowed for a more enjoyable travelling experience. Compared to my Canon I was amazed at the image quality – especially with the higher ISO settings.
Simply put I’m glad that there is a professional camera out there that fits my travelling needs. All the below images were photographed shooting RAW and edited in Adobe Lightroom 4.
Fujifilm X Pro 1 – ISO 2500 – 35mm – f1.4 – 1/170sec – Split Toning in Adobe Lightroom 4.
Fujifilm X Pro 1 – ISO 800 – 35mm – f4.5 – 1/150 sec – Split Toning in Adobe Lightroom 4.
Fujifilm X Pro 1 – ISO 800 – 35mm – f1.4 – 1/100 sec – Edited using Adobe Lightroom 4.
Fujifilm X Pro 1 – ISO 200 – 35mm – f1.4 – 1/350 sec – Edited in Adobe Lightroom 4.
Fujifilm X Pro 1 – ISO 800 – 35mm – f1.4 – 1/80 sec – Edited using Adobe Lightroom 4.
Considering I was shaking when I photographed this image Photoshop still managed to minimise the blur. After editing this photo in Adobe Lightroom and Photoshop I am happy with the result. I think the slight blur adds to the grunge of the image. It just goes to show that not every photograph needs to be pin sharp. So my conclusion is….if you want soft photographs DON’T get the Fujifilm X-Pro 1. The photos produced from this camera are pin sharp and amazing!
The first image was taken at Russell Falls in Tasmania. The final image was made from a 6 image stitch.
The second image of lavender has had some tones added to the photo
The third image was taken at the Pinnacles in Western Australia. I stood in the desert holding an umbrella protecting my camera from the strong wind. The total exposure time was 4 hours. I waited for the sunrise to get the golden light on some of the Pinnacle formations.
The fourth image has been shot against a cloudy sky. To have a clean white background. Adam you were spot on!
The fifth image of the saltlake footprints was taken near Karratha, Western Australia
The sixth image of the police officers has been heavily edited (see below)
The seventh image was taken from a hot air balloon at sunrise in the Hunter Valley, Western Australia
The eighth image has had a slight crop…roughly 2 percent of the image. I captured the Osprey with a Canon 400mm f5.6 after getting extremely close to it.
The nineth image has been warmed up to capture the sunrise. Taken at Gordon River, Western Australia
The last image was taken at Port Hedland. I got up really early for this sunrise (looking over a bay)
Below is the before and after of a few of the images….original image is on the left and edited is on the right.
Please note: The first original image of Russell Falls isn’t the original image. I don’t have a saved copy of the original edited one….this one is very similar…you should get the idea.
Thanks again to Adam for choosing my images to critique. Keep up the brilliant tutorials on lighting and general photography and I look forward to the next spreecast you do with Jared Polin (www.froknowsphoto.com).
If you are new to the blog I would love to hear your feedback…so feel free to leave me a comment.
I have been following Jared’s posts for a while now and decided that it was time to contribute to the RAW edit – Week 52.
Quite a good idea really. You download the provided RAW image and edit how you like then post it to the forum. Some of the work on the forum is truly amazing!
Here is my take on the RAW file:
Enjoy!
Here you go Ian. You can see the results. Maybe this is something I should do from now on. Post the finished versions after the video.
I wasn’t sure what image to use for my next tutorial so I hunted on dreamstime.com for a free stock image. This is what I ended up doing to it. No plan just edited in the moment.
If you learnt something from this share this on Facebook.
I just finished a video for you all on how to get the following stylized result. Considering the time (wee hours of the morning!) there is bound to be some mistakes. Ahhhh this takes me back to all-nighters in Sydney editing films and commercials! MMMMMmmmm COFFEE!!!!
The tutorial comes with the following recommendations/warnings:
1) Turn on the kettle and pour a nice hot beverage
2) Even better….just head straight to the wine cabinet
3) Take notes!
4) Don’t fall asleep.
Finally, if this tutorial has helped make sure you repost it on you’re site so others can share the love. Just copy and paste the following link:
If you are doing a bit of stitching for landscape photography you will more than likely be using PTGui for stitching your panos together.
There are a few things that I will show you that you may not know about.
Before you open your images follow these steps. By following the simple steps you will be keeping your 16bit files as 16bit not 8bit (8bit is the default for PTGui)
I hope that this helps everyone in the blogging world maintain the highest quality in their photos. If this has helped you make sure you link it on your blog so you can share it with everyone.
On my recent trip to Tasmania attending one of Christian and Nick’s courses I managed to take this pano with my trusty 85mm f1.2
I can remember everyone else on the course were waiting for the first glimpse of light at Sleepy Bay. So if anyone has any shots from the course do share the link in the comments section. That includes Christian and Nick!
Well it is finally here! Part 3 of the panoramic tutorial.
It took a while for me to get it up and going.
My little laptop has just about kicked the bucket
I had to open it up and clean out the dust to try and make it go faster!
So sit back – make sure you have a coffee – and enjoy!
I hope you learn something at the same time to.
Make sure you leave a comment (just so I know you are still awake and haven’t fallen asleep – I can be quite boring sometimes!)
Well I have had a request from Ian Oxwell about what I did to the Russell falls image. (also Danny at Fujifilm wanting to see the original as well).
I have gone one better and shown how i processed the latest image. You can see the final image in the previous post.
So here it is – the total time spent on the image was roughly 3 hours. I got bored waiting for the lappy to process some things and walked away for a while.